-
Subscribe
Subscribed
Have a WordPress.com account? Log in now.
Casual thoughts, info and stuff that other people may care about
I’ve been getting several crash reports that were caused by the main activity being launched multiple times. The app in question performs some important preparation on the main screen that will affect all the following activities so this was screwing everything up.
Now, I knew this was technically possible, since the launch mode for the main activity did not rule out this possibility, however I couldn’t figure out in which conditions this would happen practically speaking. During my testing this would never occur, so I was getting the idea that the launch mode was only relevant only to internal activities or exposed activities that other apps could start.
I had tried to go back to the app both by tapping the app icon in the home screen and by selecting the app from the task switcher. In both cases the app – or better, the task containing his activities – was simply moved to the foreground, showing the activity at its top. No matter what I did, this would always happen. Since that’s the only way to return to the app, I thought it was the only possible way to cause the activity to be created for a second time.
Eventually, after months, I finally figured out when this can happen. Although the main way to start apps is the launcher (basically, the app that manages the home screen), other apps can also launch your app’s main activity. One example is the Google Play store app. After installing an app, you’ll get an OPEN button. If you tap it, the app will launch.
Here’s the catch: if you launch the app from the Play Store, move it to the background, and then tap the icon on the home screen, the launcher will start again the main activity (by default, in the same task).
The logic seems to be this: if you start the app main activity from different apps, new instances of the activity will get created.
If you switch to the app from the task switcher, the task is simply brough to the foreground, no matter which app it was started from.
Ok, so now we know what causes our problematic multiple launches. How do we fix it, is there a suitable launch mode to avoid launching the activity again?
standard in the default mode, so let’s look at the other ones.
singleTop only avoids starting a new instance of the activity if the activity is at the top of the task. This doesn’t work because we probably have other activities launched from the main activity: the initial main activity is at the task root, not at the top.
singleTask at first sounds what we need: it will just route the new intent to the existing activity instead of creating a new one. However, it will also pop from the stack all activities above it. This is not what we want.
singleInstance is like singleTask but won’t let us start any other activity in the task, so it’s also not appropriate.
In conclusion, there’s no launch mode that will help us.
In the end, I resorted to a workaround. In the onCreate() method of the main activity, I added some code that would check if it was the task root activity. If not (duplicate instance), it would finish() the activity immediately, revealing the last activity in the task that it was about to cover.
I’m purposefully not including the code here because this is not an optimal solution and I don’t want people to just copy-paste it without checking first if there are better options.
If the app uses a single activity which presents different fragments, then the singleInstance launch mode should do the job. This has the side effect of not allowing you to start other activities in the same task though (possibly from other apps or from the system), so this solution should be carefully evaluated.
I’m here at the airport with some time to kill and I’d like to write a something about Android.
It’s really just a rant. I don’t expect anyone reading this to learn much from it. But it’s still an experience I’d like to share.
I’ve been working with Xamarin to make an iOS and Android version of the same app.
I’m not going to discuss problems related to the tool, it certainly has its quirks. Instead, I’m going to focus on the Android app model.
A quick note about my background. I’m a developer with 10+ years of experience but I’m relatively new to mobile app development. I’m an iPhone user, I’ve played a bit with iOS apps on my spare time and made some Cydia tweaks for jailbroken iPhones. Never done anything on Android. So, one might say I’m biased, it’s up to you to decide if that is the case.
The app I’ve developed has a somewhat complex “backend” but the “frontend” (UI) is actually quite simple. Several pages with lists or labels/buttons, some toolbars, a mapview … that’s pretty much it. Nothing like the jaw-dropping animation/transitions on some modern single-page apps.
The plan was to write a common backend and then write a platform-specific frontend in both iOS and Android. That’s the common pattern for Xamarin, unless you go for Xamarin.Forms.
Ok, ok, let’s get to the meat.
In Android, there are a few “components” that you can put together to make an app.
The most common component is the “Activity”…. and I’m not even sure how to describe what it is at this point.
Let’s start simple. It’s basically a full-screen view in your app that does a specific and indipendent (in theory, more on this later) task.
Now, the actual visual content is usually defined via AXML files. This rocks. I like it much more than iOS constraints-based model.
The first eyebrow-raiser moment is when you learn that a “configuration change” will cause the Activity to be destroyed and re-created. This happens in a number of circumstances, but the most common is when you rotate the device from portrait orientation to landscape or vice-versa.
The documentation says that the UI state is saved automatically for you (true, but only partially) and you’re supposed to save the internal state of your Activity object (basically the member variables). This sounds not intuitive but feasible at the beginning.
Here are the first problems:
Another annoyance is that Activities can receive some input parameters and return some output values but they must be primitive/parcealable as well.
The idea is that in Android an Activity can start an Activity in another app (or a system activity). This is what happens when you want to compose an email for instance: the activity starts a new activity with the appropriate Intent and the default mail client will launch to let you write your email.
It’s an interesting and powerful concept, but it’s not what you do all the time. You usually start other activities in your own package, so forcing all the data to be parcealable makes the common use case unnecessarily complex.
The other issue with the Activities re-creation is that, if you use asynchronous programming (async methods in C# or AsyncTask in Java I believe), you’re basically making a certain method/lambda run when the task is complete. That code will run in the current context (the method’s object or lambda’s captured references) so, guess what, you rotate your device, the task completes and the code runs on the old activity instead of the one just created for the new orientation.
There are workarounds, which basically make you do the async from within another (persistent) object and callback into the current activity.
It’s a workaround. It’s feasible, but it’s not practical.
In other platforms, the app is effectively a process. When you launch the app, the process gets started. When you close the app, the process is terminated. On mobile platforms, the process is usually suspended while the app is not visible.
On iOS, there’s no real concept of closing the app from the user point of view: it’s just in the foreground or not. What actually happens it that when you open the app the first time the process is created and gets suspended/resumed from that point. If the OS needs memory, it may kill the process. Still, the app == process assumption holds.
On Android, no. Far from it. The process is just a container for Activities.
When you start the first Activity, the process is started. When you finish the last Activity, the process terminates.
This design choice IMHO is particularly bad because it means that app-level state shared between the activities, particularly in the form of Singletons, can’t be used. Not without hacks at least.
At first, you may think it’s okay. You believe this is always going to happen:
All good right? Well, let me introduce the “activity stack restoration”…
The “activity stack” contains information about the running activities. If the OS decides to kill the container process due to low memory, the activity stack is saved. The user can go back to the app and at that point the OS creates ONLY the top activity in a new process. If the user goes “back”, the Activity will finish and the previous activity in the backstack will be created. It’s the same as when the app is running but the Activities are only created when necessary instead of being already loaded and “stopped”.
So, you can’t use a singleton to share some state because the following will happen, assuming the user was in Activity B:
The activity state restoration only works fine if you do all of the following:
One might think an Activity is just the UI for the app. In this case, if you have some business logic elsewhere, you somehow have to restore its state as well when the OS restores the Activity.
Let me put it this way: it’s like a car running on he highway. The dashboard is the UI, the car is the entire app. You’re halfway your trip, then… zap, the car disappears. Then, Android says “It’s cool bro, here’s your dashboard, exactly how you left it (assuming you told me about all of its indicators). You’re good to continue your trip.”. What about the rest of the car? Where are we? What are the tyres pressure? What’s the steering wheel angle? What’s the licence plate number?
The dashboard would have to store all of that information. Which makes no sense whatsoever.
<plang=”en-GB”>On the other hand, if you store all the information in your Activity, it becomes basically a God-object… a standalone mini-app. A mini-app that must be able to save and restore its state at any point in a parcealable format. A mini-app that must be able to communicate with other mini-apps (why yes, communicating only via parcealable intents).
Activities can be independent from each other only to a certain extent. If they’re all in the same app it’s because they have somehow to “work together” to get something done. If they were completely independent, then they would be separate apps.
You can try some workarounds to avoid putting all of your logic into an Activity, all of which have some drawbacks because they are workarounds.
The “proper” way seems to be a clusterfuck.
Some people suggest using Fragments to solve part of these issues.
Fragments are… basically activities that can be embedded into other activities. Their lifecycle normally follows the one of containing activity. However – and this is the nice thing – they can also be set to survive configuration changes (setRetainInstance()). They also don’t need to actually contain a UI. In fact, non-UI fragments are the only case where setRetainInstance is recommended. For UI fragments, like with Activities, it’s recommended to let the framework destroy and recreate it so it can adapt and use different resources for the new screen orientation (or whatever).
Non-UI fragments set to retain the instance can be used to effectively store any kind of state without the need for parcealable stuff.
However, you’re using something that is generally supposed to be part of your UI as a data container, which already smells fishy. Then, it doesn’t help with async programming, unless you use that fragment to also contain the relative code. And then invoke callbacks on the Activity.
It’s like a shit-cake with a cherry on the top.
If the OS kills the process and tries to restore the activity later, the state contained in that non-UI fragment is gone anyway (unless you save/restore parcealable stuff, but then it’s the same as activity), so it’s not even a good cherry.
The quality of the documentation is usually mediocre. Some classes are well documented, others… not quite. It reminds me of PHP or Python. I haven’t spent too much time on those though, so I can’t really compare (Python wasn’t too bad last time I had a look).
What I can say though, is that it’s definitely worse than MSDN and iOS Developer docs.
If you need to read StackOverflow to understand how something works (and even there it’s not straightforward because the correct explanation might very well be not in the accepted answer) then you know something is wrong.
My feeling is that on Android it’s easy to do really basic stuff, but it gets exponentially more difficult when you try to get serious.
I’m sure a proper app can be built if designed from the beginning with Android’s app model in mind. The problem, IMHO, is that this model sucks and being so different from other platforms makes code sharing difficult.
I recently saw a KickStarter project that was about making a small device that used an eInk display to show some random information. The screen was quite small and the device was battery powered, communicating via WiFi. I thought that this might be a good use-case for an eInk display. I wouldn’t really want a normal LCD lit all the time in my home to display some info, but it woud be cool to have something like that and this type of display would make more sense.
So i asked myself “Mmm… can i build something like this? Maybe hacking some existing hardware?” and the answer was obviously my Kindle! It has an eInk display and WiFi connectivity built-in.
In fact, some people already had the same idea (see link at the bottom).
The “problem” with these existing solutions is that they basically use a server to render an image and than they just fetch it to display it on the screen.
I don’t have a server in my current home and in general it would make more sense to me to have a device that can do everything on its own.
My idea is to use a web browser on the device to make it render custom HTML pages. This seems a good solution to me as you can create very flexible screens and also run some javascript to do whatever you want.
I haven’t done this myself but it looks like on recent devices you can do this using WebLaunch. It does all you need so if you have a Kindle Touch or Paperwhite then you’re set.
My Kindle is a K4 and it doesn’t have the stuff to make WebLaunch work. The UI is done in Java and there are no HTML pages.
But, it HAS a web browser. It’s under Menu > Experimental.
The problem is that it’s kind of limited: it doesn’t work full-screen and it can’t load local files for example.
Here is what I’ve done to remove this limitations. Please note that this is a hack and has its rough edges as i’ll explain.
This is also not a step-by-step tutorial, it’s some knowledge and experience that i want to share and i expect whoever wants to try this to “know what he’s doing” basically.
The browser only allows to use HTTP:// and HTTPS:// protocols on the address bar. My first approach was to run a small web server on the device itself and make it load pages from HTTP://localhost but this doesn’t work for some reason.
In the end I’ve just patched the browserd daemon (the process that renders the pages and runs webkit) to allow the file:// protocol.
This way if you have stored a page named “test.htm” in the device memory using the USB connection, you can access it by typing “file:///mnt/us/test.htm” in the address bar (note the 3 slashes: 2 are part of the file:// protocol, the third is the start of the absolute path /mnt/us/test.htm).
I’ve then managed to patch the browserd daemon to use the entire framebuffer to display the page fullscreen. There is a problem tough: the statusbar and addressbar are not handled by browserd, they’re managed by the normal UI process. This means that both processes will write to the same part of the screen and the last one that draws in that area will overwrite what the other has drawn. It’s not ideal but i’m not very familiar with hacking Java (by the way, the code is also obfuscated) and after all we still need to enter the URL somehow so we can’t remove completely the addressbar anyway.
The good news is that after entering the URL the pages renders and covers everything else, so it’s what we want.
You can also go to Menu > Screen Rotation > Enter (without actually changing it) to force a re-draw.
This works well enough but there’s a small issue: the system will redraw the system bar if the battery level or the signal strength changes, thus ruining our fullscreen page.
The battery level won’t change during normal use as you’ll have the USB cable alway connected to keep the device charged. The WiFi signal strengh however could change slightly depending on other radio signals around and could trigger a redraw of the system bar.
To avoid this I’ve patched the wifid daemon to not send the “signal strength changed” notification so the system won’t know about it and won’t redraw the system bar (did i say that this whole thing is a hack?).
This is relatively easy:
# lipc-set-prop -i com.lab126.powerd preventScreenSaver 1
Set it back to 0 to allow the device to sleep.
Here are the files to patch browserd and wifid: Download
WARNING: these patches are for firmware ver. 4.1.2 (2540270001)
I’ve made them using the bsdiff utility already present on the device. To apply them, copy the files to the device via USB and:
# cp /usr/bin/browserd /usr/bin/browserd_orig
# bspatch /usr/bin/browserd_orig /usr/bin/browserd /mnt/us/browserd_patch
# cp /usr/sbin/wifid /usr/sbin/wifid_orig
# bspatch /usr/sbin/wifid_orig /usr/sbin/wifid /mnt/us/wifid_patch
# killall browserd
# killall wifid
https://github.com/jp3141/KindleThermometer
https://github.com/pjimenezmateo/kindle-wallpaper
https://github.com/mpetroff/kindle-weather-display
I recently got my own Hexbright and i’d like to share some considerations. This is not a full review, you can find some of them on YouTube if you want.
Let’s start from the title: open source? What? Really?
This flashlight was launched on Kickstarter and is very special. It has an Arduino-compatible microcontroller, which you can program to do whatever you want. Heck, it even has an accelerometer!While the description is not explicit, it should be clear enough that the goal was to made the source code available to the users so that they can customize it.
Also, the team wrote on Twitter that they were going to also open the hardware:
@jedibfa We are going to release mechanical drawings, electrical drawings, and source code for the Flex!! Thats what we mean by open source!
— HexBright (@hexbright) June 9, 2011
The project was funded on Jul 18, 2011 and the first units were shipped at the end of 2012 (as far i can tell).
As today another year is almost passed and a new revision of the Hexbright is being produced, the “V2”.
So, what’s the current status of the open source stuff?
The software is available at GitHub and is complete. There is the factory-installed firmware, some examples and the bootloader:
https://github.com/hexbright
The source code is missing a license, something some people is complaining about. I’m not a lawyer but apparently, in many parts of the world, if you don’t specify a license then the writer keeps the copyright on that code. So it’s probably still not Open Source in the way we are used to.
The first version of the Hexbright was shipped with the electronics V0.7 and the Hexbright V2 is shipped with a pcb marked as V0.8.
The schematics were available in the now dismissed wiki, and the last version is V0.5, which is a pre-production version:
http://www.crowdthunder.net/hexbright/elec/hexbright-flex_v0_5_schematic.pdf
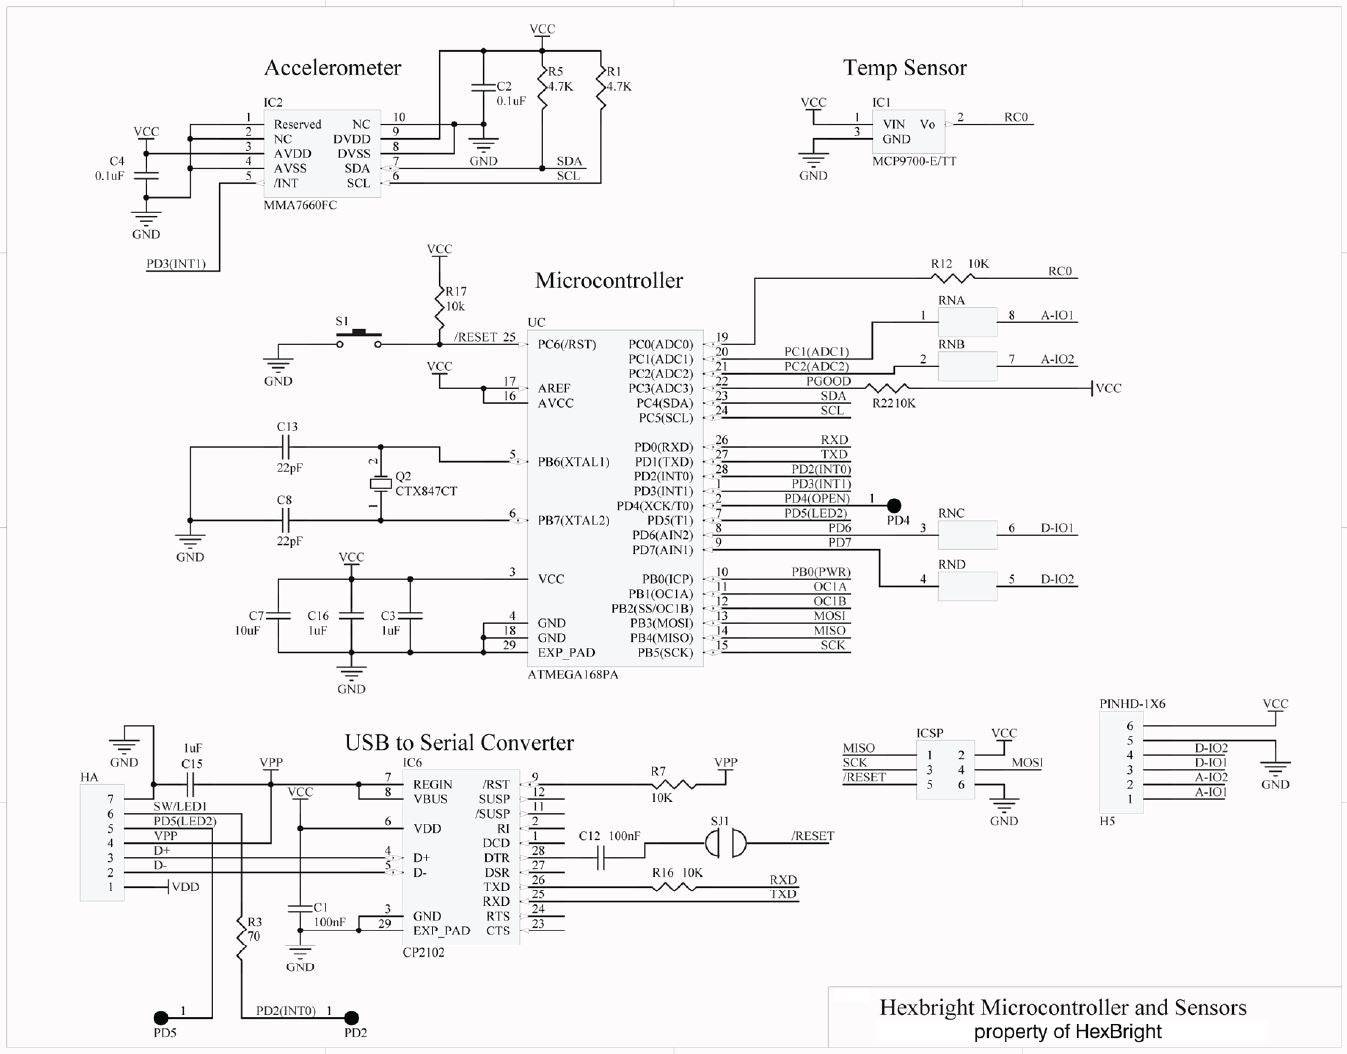
On the main website they have published a partial schematic of the production Hexbright, which does not include the led driver, power supply and battery charging:
http://cdn.shopify.com/s/files/1/0180/3005/files/HexBright-Schematic-Pic.JPG
This partial schematic and the “property of Hexbright” text in the corner looks like that have changed their mind about making it Open.
This is not my field but i think there is some very incomplete data here:
http://community.hexbright.com/c/Bodies
I think that we are halfway between closed and open source/hardware. I think that Hexbright is not really liable because it didn’t specify a license for the source code on Kickstarter and the hardware promises made on Twitter are not part of the project as it was proposed. Anyway, i can’t say that i’m really satisfied of how things are going. Questions about Open aspects of the project remain unanswered on the Kickstarter page.
Ok, let’s talk about the product.
The flashlight feels very solid and gives a good feeling when you keep it in your hand. The materials are certainly of good quality.
The button makes a good click and the size is just ok.
The light is strong but i would not call it powerful. It’s the right light you would expect from a flashlight of this size. It’s better than other flashlights i have in the house though.
There is a little thing that i’d like to talk about because it’s a weak point of this device.
The microcontroller is configured to use an external Crystal to run its oscillator. This crystal can break if you drop the flashlight.
If this happens, you have successfully bricked your new toy. This is a real problem, in fact some users have already broken their Hexbright this way. The Hexbright V2 uses a different kind of crystal but it broke too in my flashlight after a drop.
If you have the tools i’d recommend you my easy fix: reprogram the fuses of the AVR microcontroller to use the internal calibrated RC oscillator. It has the same frequency of the crystal and even if it’s less precise you shouldn’t have issues to communicate with the serial port. The oscillator is calibrated at 25°C (room temperature), you just need not to reprogram the flashlight when overheated or when you are at the north pole 😀
Feel free to ask me some questions in the comments if you want to know something in particular.
Warning:
This information is obsolete. Please look into Linux Device Tree instead.
The previous posts Controlling leds status in OpenWrt and Controlling GPIOs in OpenWrt were actually an introduction for this.
What if you want to connect some kind of SPI device to your OpenWrt device? Perhaps a microcontroller (AVR/Arduino, PIC, etc).
I recently worked on a project where i needed to have a web user interface and control an IR led emitter to emulate a remote. I considered that using an Arduino + Ethernet shield + some kind of flash storage + power supply + container box would cost me more than a TP-LINK MR3020 plus a bunch of components.
It turns out that the Linux kernel already has some modules to bitbang an SPI over the GPIO pins (spi-gpio + spi-bitbang) and also a module to expose the SPI to userland so that it can be accessed by our programs or scripts (spi-dev).
BUT there’s a problem. This stuff is not “directly” usable: it is used by other kernel drivers. We don’t have a way to dynamically say “hey, i want an SPI on those pins”. Instead we would need to rebuild the kernel adding some custom code to declare this SPI bus and also devices connected to it.
I don’t like the idea to recompile the kernel for something like this. I probably want to use this small linux box for tests, POCs, different projects, and i don’t want to rebuild the kernel and flash a new image each time.
So, i made a kernel module that allows to configure on-the-fly an SPI bus and its nodes. You can use it on a stock Attitude Adjustment image, without reflashing or recompiling anything.
By the way, if you wonder how fast this SPI can be, my tests show that it can go something above 1 MHz. Not bad at all.
I have submitted a patch to the OpenWrt developers. They may add it to the next release (not sure honestly) and be installable with opkg. But in the meantime i have built the module for the various platforms on Attitude Adjustment and you can install it manually.
spi-gpio-custom.ko for your platform in /lib/modules/<kernel version>/ (TP-Link is ar71xx – for other boards it’s the same of the image you have downloaded)opkg install kmod-spi-gpioopkg install kmod-spi-devUPDATE
the patch has been included in OpenWrt trunk, so it is now available in nightly builds and will be in future releases starting from Barrier Breaker.
The installation is straightforward:
#opkg install kmod-spi-gpio-custom
You can use the module to configure up to 4 buses with up to 8 devices each, according to the parameters that you use when loading the module.
The command you’ll use is:
#insmod spi-gpio-custom <parameters>
Here is the official doc from the source:
 *  The following parameters are adjustable:
 *
 *    bus0    These four arguments can be arrays of
 *    bus1    unsigned integers as follows:
 *    bus2
 *    bus3    <id>,<sck>,<mosi>,<miso>,<mode1>,<maxfreq1>,<cs1>,...
 *
 *  where:
 *
 *  <id>       ID to used as device_id for the corresponding bus (required)
 *  <sck>      GPIO pin ID to be used for bus SCK (required)
 *  <mosi>     GPIO pin ID to be used for bus MOSI (required*)
 *  <miso>     GPIO pin ID to be used for bus MISO (required*)
 *  <modeX>    Mode configuration for slave X in the bus (required)
 *             (see /include/linux/spi/spi.h)
 *  <maxfreqX> Maximum clock frequency in Hz for slave X in the bus (required)
 *  <csX>      GPIO pin ID to be used for slave X CS (required**)
 *
 *    Notes:
 *    *        If a signal is not used (for example there is no MISO) you need
 *             to set the GPIO pin ID for that signal to an invalid value.
 *    **       If you only have 1 slave in the bus with no CS, you can omit the
 *             <cs1> param or set it to an invalid GPIO id to disable it. When
 *             you have 2 or more slaves, they must all have a valid CS.
Your platform will have GPIOs numbered in a certain range, for example 0-50 or 400-900 (see the OpenWrt Wiki for your router). Anything outside that range is an “invalid value” per the notes above.
For each device a file on /dev will created, named spidev<bus id>.<dev id>. For example, /dev/spidev1.0
Admittedly, it’s not easy to remember. But reading that reference when you want to change something is still less annoying than rebuilding and reflashing everything, right?
We all know, examples make everything so much easier to understand. (examples are for a TP-Link MR3020)
Single bus with id 1, using gpio 7 as CLK, 29 as MOSI, no MISO and single device in spi mode 0, max 1Khz, with no CS:
#insmod spi-gpio-custom bus0=1,7,29,100,0,1000
This will result in:
/dev/spidev1.0
Single bus with id 1, using gpio 7 as CLK, 29 as MOSI, 26 as MISO, first device in spi mode 0, max 1Khz, with gpio 0 as CS, second device in spi mode 2, max 125Khz, with gpio 17 as CS:
#insmod spi-gpio-custom bus0=1,7,29,26,0,1000,0,2,125000,17
This will result in:
/dev/spidev1.0 and /dev/spidev1.1
Bus with id 1, using gpio 7 as CLK, 29 as MOSI, no MISO, with single device in spi mode 0, max 1Khz, with no CS and Bus with id 2 using gpio 26 as CLK, 17 as MOSI, no MISO with single device in spi mode 2, max 125Khz, with no CS:
#insmod spi-gpio-custom bus0=1,7,29,100,0,1000 bus1=2,26,17,100,2,125000
This will result in:
/dev/spidev1.0 and /dev/spidev2.0
Ok, now how do we transfer data?
Simplex communication is done by just writing and reading that /dev file.
For example,
#echo hello > /dev/spidev1.0
will send “hello\n”, where \n (LF) is added by echo.
For full duplex data transfer you need to use ioctl calls. See the spi-dev documentation. You can also see an example here.
If something fails, insmod will give you a description of the fault code, which is very generic and will usually tell you nothing about what happened.
To understand what’s wrong, see the kernel log running dmesg.
If you want to change your configuration, you need to unload the module and reload it with different parameters:
#rmmod spi-gpio-custom

#insmod spi-gpio-custom <new parameters>
Last, but not least, remember to unload other modules that may keep the gpio busy, for example leds_gpio:
#rmmod leds_gpio
<linux source>/Documentation/gpio.txt
<linux source>/Documentation/spi/spi-summary
<linux source>/Documentation/spi/spidev
This is a small guide to control GPIOs on OpenWrt.
First of all, you may need to unload other modules that could be using the GPIOs you want. In particular, if you want to use a GPIO which is connected to a led you’ll probably need to unload leds_gpio:
# rmmod leds_gpio
Every GPIO will have an entry in /sys/class/gpio. If you don’t see the GPIO that you want to use then it has not been configured yet. You do so by writing the GPIO number in the export file, for example:
# echo 26 > export
Then a directory for that gpio will appear, in my case gpio26. In this directory we find the files we need to control this gpio.
You want to write out to the direction file to use it as an output, or in to use it as an input:
# echo out > direction

# echo in > direction
The value file is used to – you guessed it – set or get the status of the GPIO:
# echo 0 > value

# echo 1 > value

# cat value
The active_low file is similarly used to negate the value when it’s… well, active low!
Reference: <linux source>/Documentation/gpio.txt
This is a quick how-to about controlling the status of the leds from userspace in OpenWrt.
If you have installed OpenWrt on your router the leds should be controlled by the leds_gpio kernel module. Every led will have an entry in sysfs under /sys/class/leds
To manually control a led you should first set the trigger file to none, otherwise the led will be controlled for its original function, i.e. ethernet activity indicator:
echo none > trigger
Then you can set the value by writing to the brightness file. This file represents the brightness level which should range from 0 to the value contained in the max_brightness file. However, in most cases there will not be hardware brightness control for the leds (like with GPIO), so 0 will turn OFF the led and any non-zero value will turn it ON:
echo 0 > brightness

echo 1 > brightness
An example on my TP-Link MR3020:
root@OpenWrt:~# cd /sys/class/leds/tp-link\:green\:3g/

root@OpenWrt:/sys/devices/platform/leds-gpio/leds/tp-link:green:3g# echo none > trigger

root@OpenWrt:/sys/devices/platform/leds-gpio/leds/tp-link:green:3g# echo 1 > brightness

root@OpenWrt:/sys/devices/platform/leds-gpio/leds/tp-link:green:3g# echo 0 > brightness
Note: if you don’t already know, those files are not actual files in flash, they’re virtual files that act as an interface from userland to kernel.
Note 2: if you want more control on the GPIO lines you may prefer to unload the leds_gpio module (with #rmmod leds_gpio) and directly control the GPIO and/or configure a bus on some lines, like i2c or spi.
Reference: <linux source>/Documentation/leds/leds-class.txt
I own a Macbook since i occasionally want to mess up with iOS stuff and i think it’s a great piace of hardware, but as a main OS i still use Windows.I have used Windows 7 and 8 with BootCamp 4, then i discovered that Apple eventually released BootCamp 5 and decided to do the update. After that i discovered that my clock was always wrong, 2 hours off the real time in my case. If you’re reading this, you probably have this same problem right?
So, why this happens and how to fix it?
I didn’t spend too much time on it, however it seems that Linux and OS X store the time as UTC in the hardware clock, while Windows stores it in local time (like UTC+1 and daylight offset). BootCamp sets a key in the Windows registry that should tell Windows to store it in UTC too, but apparently something doesn’t work correctly.
After some test i was able to fix it by letting Windows store the time as local time in the hardware, like it is designed to do. The registry key dosn’t seem to be documented so it’s probably not very reliable. This should mean i’ll get the wrong time on OS X but i don’t care since i never use it.
TL;DR
This will fix the clock in Windows and will probably get it wrong in OS X
HKEY_LOCAL_MACHINE\SYSTEM\CurrentControlSet\Control\TimeZoneInformationSometimes i think manufacturers do not want to sell their stuff. I go to their website and in the products section i see very few info about them. Apart some general data like the screen size, processor, ram and alike.
I was searching an all-in-one PC for a project and ended up buying the ASUS ET2220INTI-B014K and despite the time i spent on the web i still wasn’t sure what i would find in the box. So i’m going to tell you something you won’t find anywhere else.
What’s in the box?
I had no idea which accessories were included so you may wonder the same.
Some considerations
The PC looks fine and performs as expected, nothing wrong to note.
The noise is quite low, a bit louder than my MacBook, but certainly not annoying.
The remote is not that great, the power button can sleep and wake the PC but the rest of the buttons are mostly not working outside the application used to watch the TV (which, by the way, runs in Desktop mode, not Metro).
The monitor brightness can NOT be adjusted from Windows (Charm bar > Settings), you can set it via the OSD. But, the monitor supports DDC/CI so you can also set it using ScreenBright
There are some utilities that actually do no suck! Amazing! An utility shows the current power consumption in Watts, in realtime, and allows to set a green mode that uses a bit less power (not investigated what it does). The showed idle power consumption is 34W with minimum brightness and 41W with maximum brightness. Didn’t test other conditions so far. Another utility allows to update the bios, the boot logo and also allows to enable some kind of USB fast-charging mode that apparently allows to get more current from the USB ports so you can charge your mobile devices “3 times faster”. The iPhone/iPod/iPad devices are explicitly mentioned as supported.
So, after failing to open by blog on Blogger (being detected as spam) i decided to give WordPress.com a try, so far so good.
I’m going to post here some random info that i think may be useful to someone else on this planet. I often end up finding the answer to my questions on other people’s blog so i decided to try to give my contribution too.
Have a WordPress.com account? Log in now.